이 포스팅은 쿠팡 파트너스 활동의 일환으로, 이에 따른 일정액의 수수료를 제공받습니다.
안녕하세요
오늘도 k-in 입니다.
1. 서론
"이것만 알면 나도 개발 전문가" 시리즈입니다.
"Gin 을 이용한 CRUD RESTful API 개발 Part8" 를 진행하겠습니다.
Part8 에서는 SMTP 클라이언트를 구현하고 Mailtrap 서비스를 이용해 "이메일 인증"을 추가해보도록 하겠습니다.
Part7 의 내용을 아직 학습하지 않았다면 아래의 링크로 접속하여 학습을 순서대로 이어가주세요.
고 (Golang) | 이것만 알면 나도 개발 전문가 | Gin 을 이용한 CRUD RESTful API 개발 Part7 - JWT 인증 기능
이 포스팅은 쿠팡 파트너스 활동의 일환으로, 이에 따른 일정액의 수수료를 제공받습니다. HTML 삽입 미리보기할 수 없는 소스 안녕하세요 오늘도 k-in 입니다. 1. 서론 "이것만 알면 나도 개발 전
k-in.tistory.com
이번 강좌를 진행하기 위해서는 Part7 의 소스코드가 꼭 필요합니다.
아래 웹 사이트에 방문하셔서 Clone 버튼을 꾹 눌러주세요.
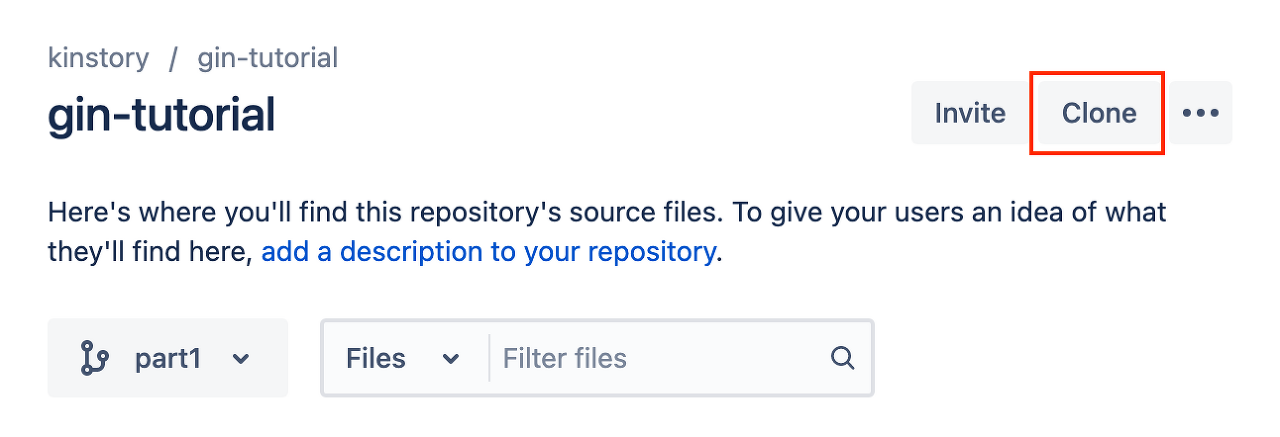
https://bitbucket.org/kinstory/gin-tutorial/src/part7/
Bitbucket
bitbucket.org
2. 강좌 순서
이번 강좌에서는 회원 가입 및 이메일 인증을 통해 사용자를 인증하는 방법에 대해 다루겠습니다.
순서는 아래와 같습니다.
- Mailtrap 서비스 소개
- 메일 발송을 위한 HTML 템플릿 구성
- 이메일 발송 함수 작성
- User Service 타입 구현
- SignUpUser 컨트롤러 수정
3. Mailtrap 서비스 소개
Mailtrap 서비스는 이메일 발송 등의 구현을 테스트하는데 최적화된 서비스입니다.
회원가입 후에 무료로 테스트 메일을 발송할 수 있으며 무려 공짜(Free)입니다.
아래 링크에 접속하여 회원가입을 해봅니다.
회원가입을 통해 인증을 하면 아래와 같은 화면이 나옵니다.

My Inbox 에 접근해봅니다.
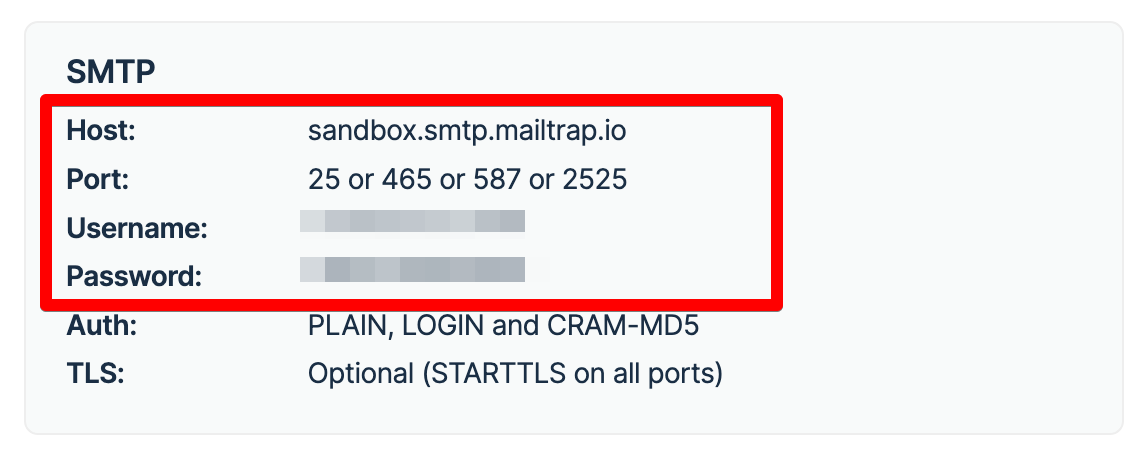
Show Credentials 를 클릭하여 확장하면 Mailtrap 을 사용하기 위한 호스트, 포트 번호, 아이디, 패스워드를 알려줍니다.

확장한 화면에서 아래의 붉은색으로 네모 안에 있는 정보를 미리 복사해둡니다.
이 정보는 Go 프로그램 내에서 환경 변수로 등록해 사용합니다.
4. 메일 발송을 위한 HTML 템플릿 구성
이제 메일 발송을 위해 HTML 템플릿이 필요합니다.
아래와 같이 미리 구해온 HTML 소스코드를 각각의 파일로 생성해서 붙여넣어봅시다.
HTML 코드에는 Go 에서 지원하는 템플릿 문법이 포함되어 있습니다. 각각에 대한 설명은 소스코드 하단에서 설명합니다.
아래의 명령어를 실행해 templates 폴더 내에 세개의 파일을 생성합니다.
$ touch templates/base.html templates/styles.html templates/userValidation.html
base.html 파일에 아래의 소스코드를 입력합니다.
<!-- filename: base.html -->
{{define "base"}}
<!DOCTYPE html>
<html>
<head>
<meta name="viewport" content="width=device-width, initial-scale=1.0" />
<meta http-equiv="Content-Type" content="text/html; charset=UTF-8" />
{{template "styles" .}}
<title>{{ .Subject}}</title>
</head>
<body>
<table
role="presentation"
border="0"
cellpadding="0"
cellspacing="0"
class="body"
>
<tr>
<td> </td>
<td class="container">
<div class="content">
<!-- START CENTERED WHITE CONTAINER -->
{{block "content" .}}{{end}}
<!-- END CENTERED WHITE CONTAINER -->
</div>
</td>
<td> </td>
</tr>
</table>
</body>
</html>
{{end}}
- {{define "base"}} 는 현재 템플릿의 alias 이름을 지정합니다. 이 alias 이름은 다른 템플릿이 참조할 때 사용됩니다.
- {{template "styles" . }} 는 styles 템플릿을 불러옵니다.
- {{ .Subject }} 는 템플릿에 제공된 데이터의 필드를 의미합니다. 데이터는 하위 필드에 Subject 라는 필드가 있어야 템플릿이 제대로 동작합니다.
- {{block "content .}}{{end}} 다른 템플릿을 불러올 공간을 정의합니다. 이 공간에는 상세 내용과 같은 컨텐츠가 배치됩니다.
styles.html 파일은 템플릿의 스타일을 지정합니다. 아래의 코드를 입력합니다.
{{define "styles"}}
<style>
  /* -------------------------------------
          GLOBAL RESETS
      ------------------------------------- */

  /*All the styling goes here*/

  img {
    border: none;
    -ms-interpolation-mode: bicubic;
    max-width: 100%;
  }

  body {
    background-color: #f6f6f6;
    font-family: sans-serif;
    -webkit-font-smoothing: antialiased;
    font-size: 14px;
    line-height: 1.4;
    margin: 0;
    padding: 0;
    -ms-text-size-adjust: 100%;
    -webkit-text-size-adjust: 100%;
  }

  table {
    border-collapse: separate;
    mso-table-lspace: 0pt;
    mso-table-rspace: 0pt;
    width: 100%;
  }
  table td {
    font-family: sans-serif;
    font-size: 14px;
    vertical-align: top;
  }

  /* -------------------------------------
          BODY & CONTAINER
      ------------------------------------- */

  .body {
    background-color: #f6f6f6;
    width: 100%;
  }

  /* Set a max-width, and make it display as block so it will automatically stretch to that width, but will also shrink down on a phone or something */
  .container {
    display: block;
    margin: 0 auto !important;
    /* makes it centered */
    max-width: 580px;
    padding: 10px;
    width: 580px;
  }

  /* This should also be a block element, so that it will fill 100% of the .container */
  .content {
    box-sizing: border-box;
    display: block;
    margin: 0 auto;
    max-width: 580px;
    padding: 10px;
  }

  /* -------------------------------------
          HEADER, FOOTER, MAIN
      ------------------------------------- */
  .main {
    background: #ffffff;
    border-radius: 3px;
    width: 100%;
  }

  .wrapper {
    box-sizing: border-box;
    padding: 20px;
  }

  .content-block {
    padding-bottom: 10px;
    padding-top: 10px;
  }

  .footer {
    clear: both;
    margin-top: 10px;
    text-align: center;
    width: 100%;
  }
  .footer td,
  .footer p,
  .footer span,
  .footer a {
    color: #999999;
    font-size: 12px;
    text-align: center;
  }

  /* -------------------------------------
          TYPOGRAPHY
      ------------------------------------- */
  h1,
  h2,
  h3,
  h4 {
    color: #000000;
    font-family: sans-serif;
    font-weight: 400;
    line-height: 1.4;
    margin: 0;
    margin-bottom: 30px;
  }

  h1 {
    font-size: 35px;
    font-weight: 300;
    text-align: center;
    text-transform: capitalize;
  }

  p,
  ul,
  ol {
    font-family: sans-serif;
    font-size: 14px;
    font-weight: normal;
    margin: 0;
    margin-bottom: 15px;
  }
  p li,
  ul li,
  ol li {
    list-style-position: inside;
    margin-left: 5px;
  }

  a {
    color: #3498db;
    text-decoration: underline;
  }

  /* -------------------------------------
          BUTTONS
      ------------------------------------- */
  .btn {
    box-sizing: border-box;
    width: 100%;
  }
  .btn > tbody > tr > td {
    padding-bottom: 15px;
  }
  .btn table {
    width: auto;
  }
  .btn table td {
    background-color: #ffffff;
    border-radius: 5px;
    text-align: center;
  }
  .btn a {
    background-color: #ffffff;
    border: solid 1px #3498db;
    border-radius: 5px;
    box-sizing: border-box;
    color: #3498db;
    cursor: pointer;
    display: inline-block;
    font-size: 14px;
    font-weight: bold;
    margin: 0;
    padding: 12px 25px;
    text-decoration: none;
    text-transform: capitalize;
  }

  .btn-primary table td {
    background-color: #3498db;
  }

  .btn-primary a {
    background-color: #3498db;
    border-color: #3498db;
    color: #ffffff;
  }

  /* -------------------------------------
          OTHER STYLES THAT MIGHT BE USEFUL
      ------------------------------------- */
  .last {
    margin-bottom: 0;
  }

  .first {
    margin-top: 0;
  }

  .align-center {
    text-align: center;
  }

  .align-right {
    text-align: right;
  }

  .align-left {
    text-align: left;
  }

  .clear {
    clear: both;
  }

  .mt0 {
    margin-top: 0;
  }

  .mb0 {
    margin-bottom: 0;
  }

  .preheader {
    color: transparent;
    display: none;
    height: 0;
    max-height: 0;
    max-width: 0;
    opacity: 0;
    overflow: hidden;
    mso-hide: all;
    visibility: hidden;
    width: 0;
  }

  .powered-by a {
    text-decoration: none;
  }

  hr {
    border: 0;
    border-bottom: 1px solid #f6f6f6;
    margin: 20px 0;
  }

  /* -------------------------------------
          RESPONSIVE AND MOBILE FRIENDLY STYLES
      ------------------------------------- */
  @media only screen and (max-width: 620px) {
    table.body h1 {
      font-size: 28px !important;
      margin-bottom: 10px !important;
    }
    table.body p,
    table.body ul,
    table.body ol,
    table.body td,
    table.body span,
    table.body a {
      font-size: 16px !important;
    }
    table.body .wrapper,
    table.body .article {
      padding: 10px !important;
    }
    table.body .content {
      padding: 0 !important;
    }
    table.body .container {
      padding: 0 !important;
      width: 100% !important;
    }
    table.body .main {
      border-left-width: 0 !important;
      border-radius: 0 !important;
      border-right-width: 0 !important;
    }
    table.body .btn table {
      width: 100% !important;
    }
    table.body .btn a {
      width: 100% !important;
    }
    table.body .img-responsive {
      height: auto !important;
      max-width: 100% !important;
      width: auto !important;
    }
  }

  /* -------------------------------------
          PRESERVE THESE STYLES IN THE HEAD
      ------------------------------------- */
  @media all {
    .ExternalClass {
      width: 100%;
    }
    .ExternalClass,
    .ExternalClass p,
    .ExternalClass span,
    .ExternalClass font,
    .ExternalClass td,
    .ExternalClass div {
      line-height: 100%;
    }
    .apple-link a {
      color: inherit !important;
      font-family: inherit !important;
      font-size: inherit !important;
      font-weight: inherit !important;
      line-height: inherit !important;
      text-decoration: none !important;
    }
    #MessageViewBody a {
      color: inherit;
      text-decoration: none;
      font-size: inherit;
      font-family: inherit;
      font-weight: inherit;
      line-height: inherit;
    }
    .btn-primary table td:hover {
      background-color: #34495e !important;
    }
    .btn-primary a:hover {
      background-color: #34495e !important;
      border-color: #34495e !important;
    }
  }
</style>
{{end}}
마지막으로 userValidation.html 입니다. 해당 템플릿은 base.html 템플릿을 불러오고 content 블록에 대한 컨텐츠를 제공합니다.
{{template "base" .}} {{define "content"}}
<table role="presentation" class="main">
  <!-- START MAIN CONTENT AREA -->
  <tr>
    <td class="wrapper">
      <table role="presentation" border="0" cellpadding="0" cellspacing="0">
        <tr>
          <td>
            <p>Hi {{ .Username}},</p>
            </br>
            <p>이메일 인증을 통해 계정을 활성화하세요. 인증절차가 완료되어야 계정 로그인이 가능합니다.</p>
            <table
              role="presentation"
              border="0"
              cellpadding="0"
              cellspacing="0"
              class="btn btn-primary"
            >
              <tbody>
                <tr>
                  <td align="left">
                    <table
                      role="presentation"
                      border="0"
                      cellpadding="0"
                      cellspacing="0"
                    >
                      <tbody>
                        <tr>
                          <td>
                            <a href="{{.ValidationURL}}" target="_blank"
                              >계정 인증</a
                            >
                          </td>
                        </tr>
                      </tbody>
                    </table>
                  </td>
                </tr>
              </tbody>
            </table>
            <p>k-in.com 드림 </p>
          </td>
        </tr>
      </table>
    </td>
  </tr>

  <!-- END MAIN CONTENT AREA -->
</table>
{{end}}
- {{define "content"}} HTML 코드 {{end}} 는 base.html 내에 들어갈 html 코드를 정의합니다.
계정 인증 메일을 발송할 HTML 템플릿이 작성되었습니다.
다음단계로 넘어가 볼까요?
5. 이메일 발송 함수 작성
이메일 발송 등의 구현을 위해서는 아래의 패키지들이 필요합니다.
# gomail.v2 이메일 발송 패키지
$ go get gopkg.in/gomail.v2
# html 을 text 로 변경해주는 패키지
$ go get github.com/k3a/html2text
# 랜덤한 문자열을 생성하는 패키지
$ go get github.com/thanhpk/randstr
다음으로 환경 변수 파일을 업데이트 해줍니다.
Part7 의 app.env 파일에 HOST, EMAIL_FROM ~ SMTP_PASS 환경변수를 차례로 입력합니다.
입력 정보는 Mailtrap 가입을 통해 얻은 정보를 이용합니다.
HOST=http://localhost
PORT=8001
# Mongo & Redis Configuration
MONGO_INITDB_ROOT_USERNAME=root
MONGO_INITDB_ROOT_PASSWORD=password123
MONGODB_LOCAL_URI=mongodb://root:password123@localhost:6000
REDIS_URL=localhost:6379

EMAIL_FROM=k-in@k-in.com
SMTP_HOST=smtp.mailtrap.io
SMTP_PORT=587
SMTP_USER=<<user>>
SMTP_PASS=<<password>>
환경변수 파일이 변경되었으므로 이를 맵핑하기 위한 코드가 추가되어야 합니다.
- config/default.go 파일에 접근하여 SMTP 발송과 관련된 정보를 추가합니다.
package config

import "github.com/spf13/viper"

type Config struct {
	Host      string `mapstructure:"HOST"`
	Port      string `mapstructure:"PORT"`
	MongoUri  string `mapstructure:"MONGODB_LOCAL_URI"`
	RedisUri  string `mapstructure:"REDIS_URL"`
	EmailFrom string `mapstructure:"EMAIL_FROM"`
	SMTPPass  string `mapstructure:"SMTP_PASS"`
	SMTPUser  string `mapstructure:"SMTP_USER"`
	SMTPHost  string `mapstructure:"SMTP_HOST"`
	SMTPPort  int    `mapstructure:"SMTP_PORT"`
}

func LoadConfig(path string) (config Config, err error) {

	viper.AddConfigPath(path)
	viper.SetConfigType("env")
	viper.SetConfigName("app")

	viper.AutomaticEnv()

	err = viper.ReadInConfig()
	if err != nil {
		return
	}
	err = viper.Unmarshal(&config)
	return
}
환경 변수가 설정되면 아래와 같이 소스코드 파일을 작성해봅니다.
- ParseTemplateDir 함수는 지정된 경로에 있는 템플릿들을 모두 모아 등록합니다. 등록된 템플릿 들은 프로그램 실행 메모리에 파싱된 형태로 보존되며 사용자는 원하는 템플릿 파일의 이름을 이용해 편리하게 템플릿 정보를 불러올 수 있습니다.
- SendValidationEmail 함수는 사용자 정보(DBResponse), 발송할 이메일 본문 내 정보(ValidationEmailData), 템플릿 파일 이름(templateName)들을 인자로하여 이메일을 전송합니다. 여기서 gomail.v2, html2text 등의 함수가 사용됩니다.
- ValidationEmailData 구조체는 이메일 본문에 들어갈 가변형 데이터를 지정합니다. 제목, 사용자 이름, 인증에 필요한 인증코드가 삽입된 URL 입니다.
// filename: utils/mail.go
package utils

import (
	"bytes"
	"crypto/tls"
	"log"
	"os"
	"path/filepath"
	"text/template"

	"github.com/k3a/html2text"
	"gopkg.in/gomail.v2"
	"k-in.com/gin-tutorial/config"
	"k-in.com/gin-tutorial/models"
)

// 인증 이메일을 발송하기 위한 데이터 구조
type ValidationEmailData struct {
	ValidationURL string
	Username      string
	Subject       string
}

func ParseTemplateDir(dir string) (*template.Template, error) {
	var paths []string
	err := filepath.Walk(dir, func(path string, info os.FileInfo, err error) error {
		if err != nil {
			return err
		}

		if !info.IsDir() {
			paths = append(paths, path)
		}
		return nil
	})

	if err != nil {
		return nil, err
	}

	return template.ParseFiles(paths...)

}

// email 발송을 함
func SendValidationEmail(user *models.DBResponse, data *ValidationEmailData, templateName string) error {
	config, err := config.LoadConfig(".")
	if err != nil {
		log.Fatal("could not load config", err)
	}

	from := config.EmailFrom
	to := user.Email
	smtpHost := config.SMTPHost
	smtpPort := config.SMTPPort
	smtpUser := config.SMTPUser
	smtpPass := config.SMTPPass

	var body bytes.Buffer

	template, err := ParseTemplateDir("templates")
	if err != nil {
		log.Fatal("could not parse template", err)
	}

	template = template.Lookup(templateName)
	template.Execute(&body, &data)

	m := gomail.NewMessage()
	m.SetHeader("From", from)
	m.SetHeader("To", to)
	m.SetHeader("Subject", data.Subject)
	m.SetBody("text/html", body.String())
	m.AddAlternative("text/plain", html2text.HTML2Text(body.String()))

	d := gomail.NewDialer(smtpHost, smtpPort, smtpUser, smtpPass)
	d.TLSConfig = &tls.Config{InsecureSkipVerify: true}

	if err := d.DialAndSend(m); err != nil {
		return err
	}

	return nil
}
6. User Service 구현
회원 가입과 동시에 회원 인증 역할을 하는 검증 코드(verificationCode)를 회원 정보에 업데이트하는 로직을 구현해봅시다.
이를 통해 Go 언어를 통해 MongoDB 의 데이터를 업데이트하는 스킬을 익힐 수 있습니다.
아래와 같이 두개의 파일을 생성합니다.
$ touch services/user.service.go services/user.service.impl.goPart7 에서 설명하였듯이 service 객체는 인터페이스 타입으로 정의하고 구현할 함수를 정의하는 역할을 합니다.
UserService 인터페이스 타입을 정의하고 UpdateUserById 함수를 정의합니다. 이 함수는 회원정보에 기반하여 특정 필드를 업데이트하는 역할을 합니다.
package services

import "k-in.com/gin-tutorial/models"

type UserService interface {
	UpdateUserById(id string, data *models.UpdateInput) (*models.DBResponse, error)
}
다음으로 UserService 를 구현하는 UserServiceImpl 타입을 정의합니다.
- toDoc 는 업데이트할 데이터를 Marshal ▶ UnMarshal 을 통해 MongoDB 에서 처리하는 bson 데이터로 변환하는 역할을 합니다.
- MongoDB 컬렉션의 _id 식별자를 통해 검색한 뒤 변경할 데이터를 업데이트하는 구조를 취합니다. 이때 $set 연산자를 사용합니다.
- 업데이트가 정상적으로 완료되면 error 타입의 zero value 인 nil 값을 리턴합니다. 그렇지 않은 경우 에러를 리턴합니다.
package services

import (
	"context"

	"go.mongodb.org/mongo-driver/bson"
	"go.mongodb.org/mongo-driver/bson/primitive"
	"go.mongodb.org/mongo-driver/mongo"
	"k-in.com/gin-tutorial/models"
)

type UserServiceImpl struct {
	collection *mongo.Collection
	ctx        context.Context
}

func NewUserServiceImpl(collection *mongo.Collection, ctx context.Context) UserService {
	return &UserServiceImpl{
		collection: collection,
		ctx:        ctx,
	}
}

func toDoc(v interface{}) (doc *bson.D, err error) {
	data, err := bson.Marshal(v)
	if err != nil {
		return
	}

	err = bson.Unmarshal(data, &doc)
	return
}

func (us *UserServiceImpl) UpdateUserById(
	id string,
	data *models.UpdateInput) (*models.DBResponse, error) {

	doc, err := toDoc(data)
	if err != nil {
		return &models.DBResponse{}, err
	}

	obId, _ := primitive.ObjectIDFromHex(id)
	query := bson.D{{Key: "_id", Value: obId}}
	update := bson.D{{Key: "$set", Value: doc}}

	_, err = us.collection.UpdateOne(us.ctx, query, update)
	if err != nil {
		return &models.DBResponse{}, err
	}
	return &models.DBResponse{}, nil
}
UpdateInput 은 MongoDB 의 사용자 정보를 업데이트하기 위한 모델 타입입니다. 업데이트를 위한 타입이므로 omitempty 를 모든 필드에 선언하여 업데이트하지 않는 필드는 MongoDB 에 전송이 되지 않도록 태깅을 남깁니다.
- models/user.model.go 파일에 아래의 타입을 추가합니다.
type UpdateInput struct {
	Name             string    `json:"name,omitempty" bson:"name,omitempty"`
	Email            string    `json:"email,omitempty" bson:"email,omitempty"`
	Password         string    `json:"password,omitempty" bson:"password,omitempty"`
	Role             string    `json:"role,omitempty" bson:"role,omitempty"`
	VerificationCode string    `json:"verificationCode,omitempty" bson:"verificationCode,omitempty"`
	Verified         bool      `json:"verified,omitempty" bson:"verified,omitempty"`
	CreatedAt        time.Time `json:"created_at,omitempty" bson:"created_at,omitempty"`
	UpdatedAt        time.Time `json:"updated_at,omitempty" bson:"updated_at,omitempty"`
}
7. SignUpUser 컨트롤러 수정
Part7 에서 구현한 SignUpUser 함수에 코드를 추가하겠습니다. 전체 소스는 링크를 통해서 확인할 수 있습니다.
- 인증 코드를 생성하기 위해 "github.com/thanhpk/randstr" 패키지를 이용합니다. 길이가 20인 랜덤한 문자열을 출력합니다.
- 이 코드를 올바르게 전송하기 위해 utils.Encode 함수를 이용해 Base64 로 인코딩을 합니다.
- 이전 단계에서 구현한 UpdateUserById 함수를 호출하여 사용자 데이터를 업데이트 합니다.
- ValidationEmailData 타입의 변수를 생성하여 SendValidationEmail 함수를 통해 전송하도록 합니다. 여기서 템플릿 파일의 이름을 인자로 제공합니다.
func (ac *AuthController) SignUpUser(ctx *gin.Context) {
	// (지면상 생략)

	config, err := config.LoadConfig(".")
	if err != nil {
		log.Fatal("could not load config", err)
	}

	verificationCode := randstr.String(20)
	verificationCode = utils.Encode(verificationCode)

	// 사용자 데이터 업데이트
	updateData := &models.UpdateInput{
		VerificationCode: verificationCode,
	}

	_, err = ac.userService.UpdateUserById(newUser.ID.Hex(), updateData)
	if err != nil {
		log.Fatal("could not update user verificationCode", err)
		ctx.JSON(http.StatusBadGateway, gin.H{"status": "fail", "message": "There was an error updating user info"})
		return
	}

	emailData := utils.ValidationEmailData{
		ValidationURL: config.Host + ":" + config.Port + "/verify/" + verificationCode,
		Username:      newUser.Name,
		Subject:       "계정 인증 코드 발송",
	}

	err = utils.SendValidationEmail(newUser, &emailData, "userValidation.html")
	if err != nil {
		log.Fatal("could not send email")
		ctx.JSON(http.StatusBadGateway, gin.H{"status": "fail", "message": "There was an error sending email"})
		return
	}

	message := "We sent an email with a verification code to " + user.Email

	ctx.JSON(http.StatusCreated, gin.H{"status": "success", "message": message})
}
utils.Encode 함수는 사용자 정의함수로 Base64 인코딩을 합니다. 이 함수의 구현은 아래와 같습니다.
- utils/encode.go 소스파일을 생성하여 아래의 코드를 입력합니다.
package utils

import "encoding/base64"

func Encode(s string) string {
	data := base64.StdEncoding.EncodeToString([]byte(s))
	return string(data)
}
이제 대망의 마지막 변경 작업입니다.
UserService 타입이 추가되었고, AuthController 의 SignUpUser 함수가 변경되었습니다.
- cmd/main.go 소스코드에 반영합니다. 변경된 내용만 참고하여 코드를 약간 수정해줍니다.
var (
    // 생략
	authCollection      *mongo.Collection
	authService         services.AuthService
	userService         services.UserService // 추가
    // 생략
)


func init() {
	// 생략

    authCollection = mongoclient.Database("gin-tutorial").Collection("users")
	authService = services.NewAuthService(authCollection, ctx)
    // userService 추가
	userService = services.NewUserServiceImpl(authCollection, ctx)
    // NewAuthController 함수의 인자에 userService 변수를 추가
	AuthController = controllers.NewAuthController(authService, userService, ctx, authCollection)
	AuthRouteController = routes.NewAuthRouteController(AuthController)

    // 생략
}
8. 구현 테스트
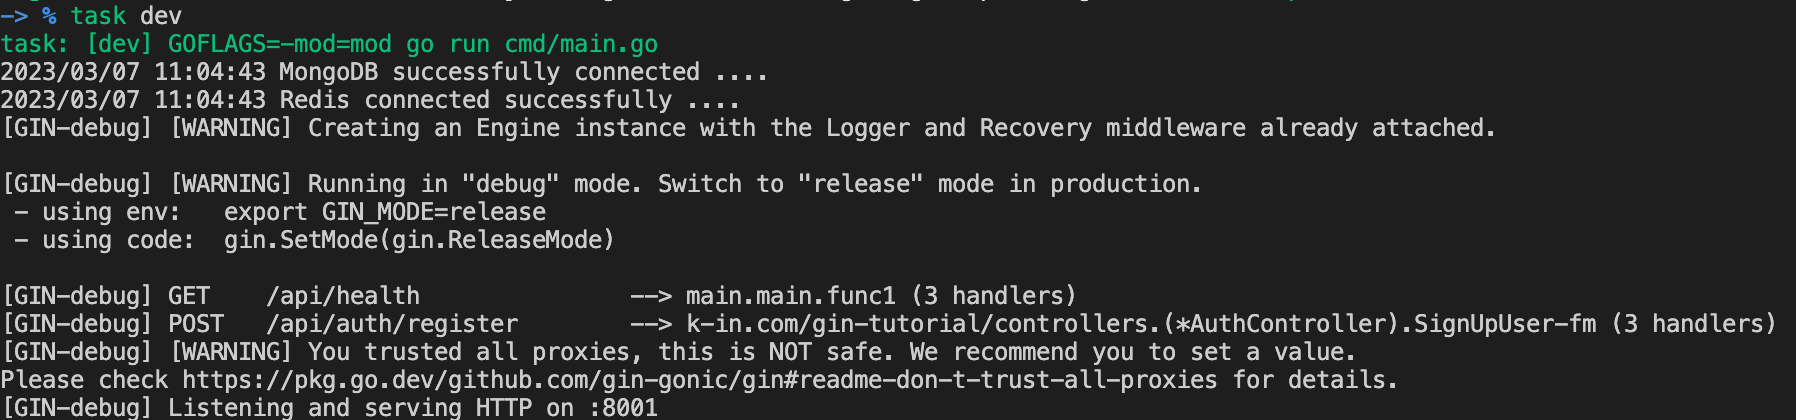
이제 구현된 소스코드를 실행하여 테스트해보도록 하겠습니다. Postman 을 통해 테스트해보겠습니다.
- taskfile 에 정의된 dev 명령을 이용해 빌드 없이 실행합니다. (디버깅이 필요할 수 있으니까요)
postman 을 실행시켜 아래와 같이 POST HTTP 요청을 작성합니다.
아직 postman 을 받아들일 준비가 안되었다구요? 아쉽지만 curl 명령어로 시도해도됩니다 :)
curl --location 'http://localhost:8001/api/auth/register' \
--header 'Content-Type: application/json' \
--data-raw '{
    "name": "k-in4",
    "email": "k-in4@k-in.com",
    "password": "test1234!",
    "passwordConfirm": "test1234!"
}'
요청을 전송하면 success 응답이 떨어지면서 인증 코드를 메일로 발송하였다고 메시지가 출력됩니다. 오류 없이 잘 완성되었네요.

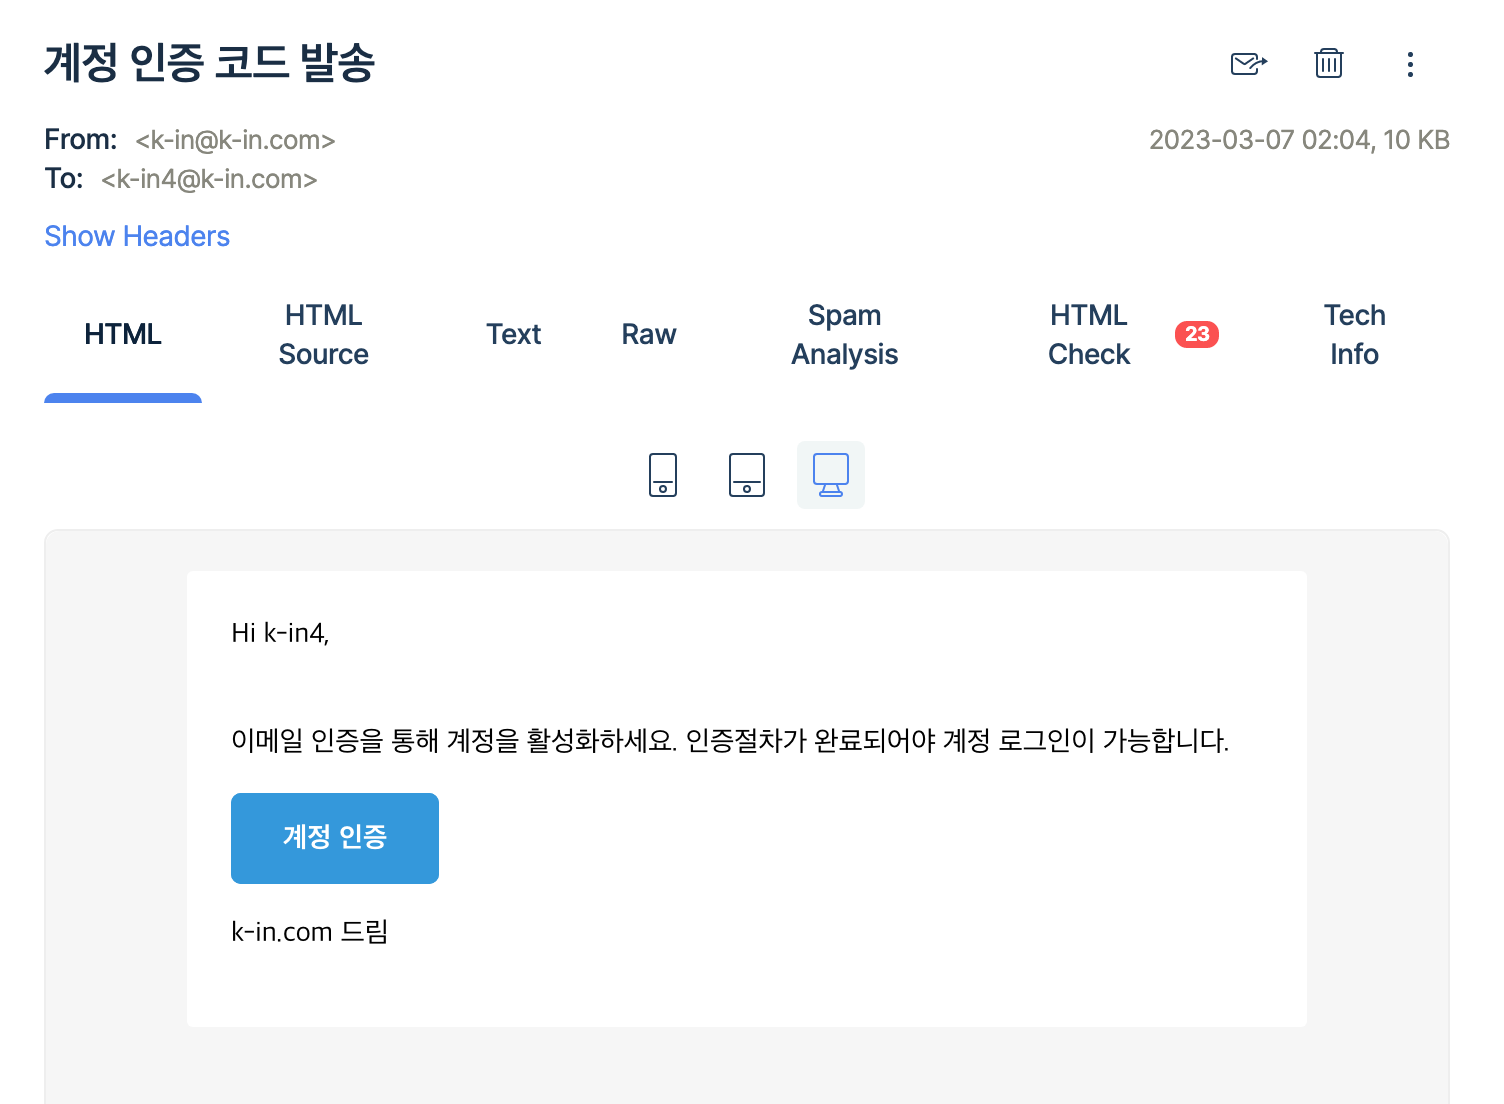
이제 mailtrap 에 접속하여 발송된 메일을 보겠습니다.
정상적으로 데이터가 작성되어서 전송되었습니다.
마지막으로 인증전의 사용자는 verified 필드가 false 이고 이번에 추가된 verificationCode 에 인증 코드가 있어야합니다.
아래의 MongoDB 쿼리식을 통해서 조회하면 정상적으로 데이터가 업데이트되어 있음을 확인할 수 있습니다.
db('gin-tutorial').collection('users').find({'email': 'k-in4@k-in.com'}).limit(100).toArray()
실제로 회원이 인증 URL(이메일 상의 계정 인증 버튼)을 클릭할 때 인증이 완료되는 절차는 다음 시간에 다루어보겠습니다.
맺음말
오늘은 "Gin 을 이용한 CRUD RESTful API 개발 Part8" 을 통해 SMTP 클라이언트를 구현하고 Mailtrap 서비스를 이용해 "이메일 인증" 방법을 배웠습니다.
이 과정을 통해 아래의 스킬들을 습득하였습니다.
- 개발 중 이메일 발송 테스트 시에는 mailtrap.io 을 이용할 것
- 이메일 발송에 필요한 gomail.v2 패키지와 그 사용 방법
- 주어진 길이 만큼 랜덤한 문자열을 생성하는 randstr 패키지와 그 사용 방법
- Go 언어에서 문자열을 base64 를 인코딩하는 방법
- 변경 개발 시 새로운 서비스 추가와 적용 방법을 체험 (***제일 중요***)
- MongoDB 데이터의 업데이트를 위한 모델 타입(UpdateInput) 선언과 omitempty 태깅 속성의 지정방법
- 로직 에러시 에러 처리
오늘 진행한 튜토리얼의 소스는 아래의 경로에서 다운받아서 살펴볼 수 있습니다.
아래 웹 사이트에 방문하셔서 Clone 버튼을 꾹 눌러주세요.

https://bitbucket.org/kinstory/gin-tutorial/src/part8/
Bitbucket
bitbucket.org
다음 시간에서는 "인증 로직 후 회원 활성화 로직" 과 "로그인 및 JWT 토큰 발급"을 진행하도록 하겠습니다.
더욱 흥미 진진한 시간이 기다리니 많은 구독 부탁드리겠습니다.
이상으로 K-IN 이었습니다.
즐거운 하루되세요


